Pro Tips #59
Lansweeper Sites, Custom Fields, and API –
For Lansweeper On-Premise, I like to take advantage of custom fields to store various bits of data – from manual fields such as a description or definition (See The Importance of Asset Classification – Lansweeper ), to fields that I programmatically update from other systems via SQL Stored Procedures and Scheduled Tasks.
I couldn’t, however, do this with Lansweeper Sites – until recently – when we added the ability to edit asset data with the API! There was only one teeny, tiny problem: I had absolutely no idea how to do it. Naturally, I thought to myself – ‘I’ll bumble my way through it and do a Pro-Tip.’
Objective
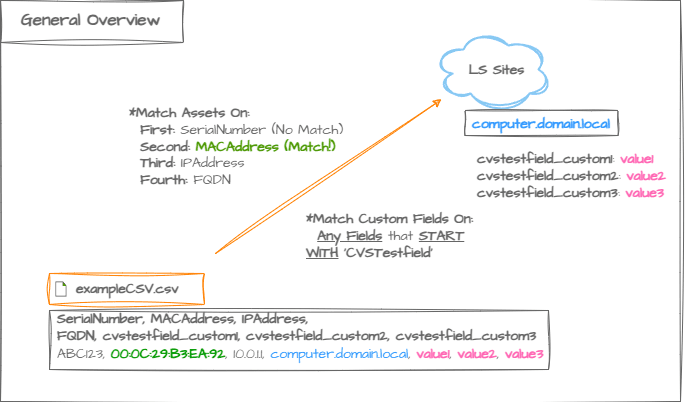
Here’s a high-level overview of what I want to accomplish: Take a CSV with asset data, and update three custom fields with data:
API Documentation
There’s a lot of applications that have really bad API documentation – but lucky for me, Lansweeper isn’t one of them. Going to Documentation – Lansweeper provides not only the standard generated API documentation, but explanations, examples, and walkthroughs – exactly what I needed to get this Pro-Tip going.
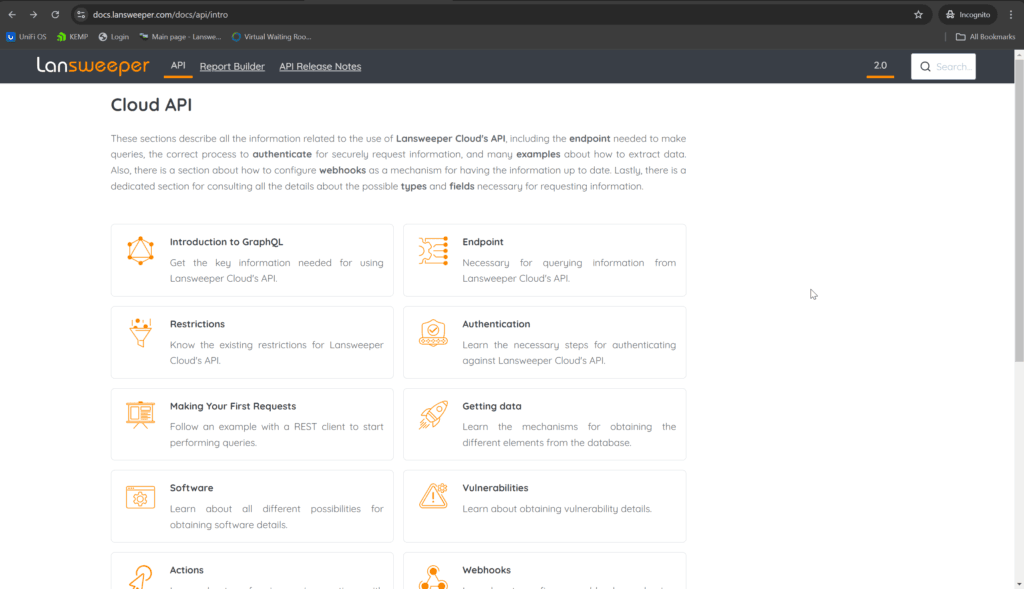
The first thing I read was the ‘Authentication’ section – Documentation – Lansweeper – which walked me through how to create an application for me to gain access and authenticate to.
Creating an API Client in LS Sites
Armed with how to authenticate, the fun begins – so let’s begin!
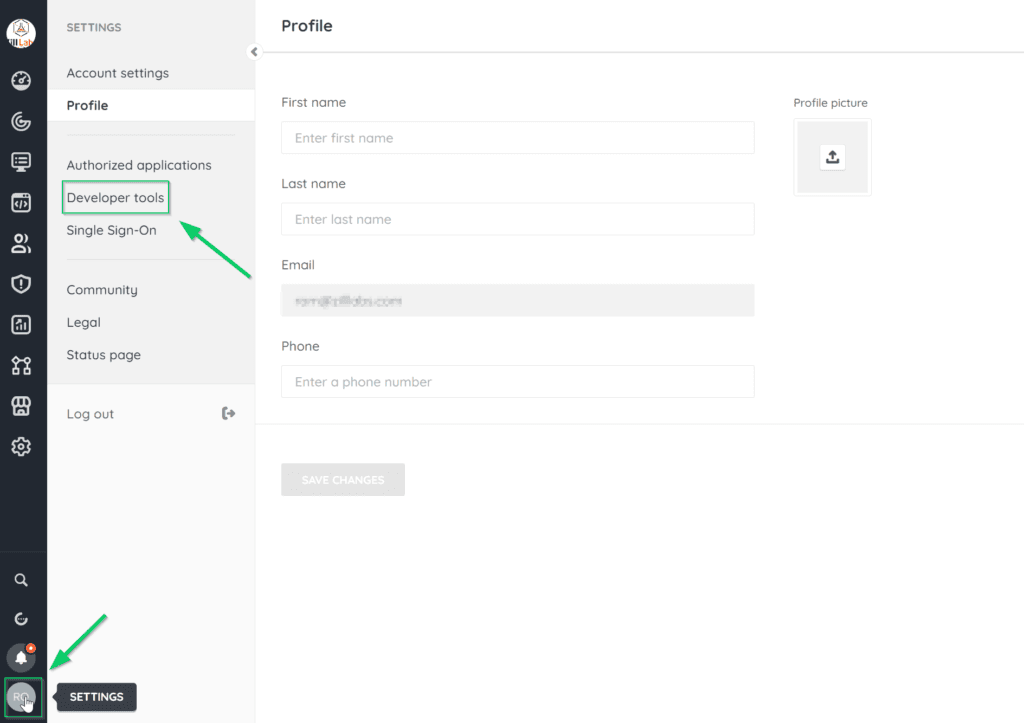
We will first need to create an ‘API Client’ in Lansweeper Sites. You can do that by clicking on your avatar at the bottom left to go to ‘settings’ > ‘Developer Tools’:
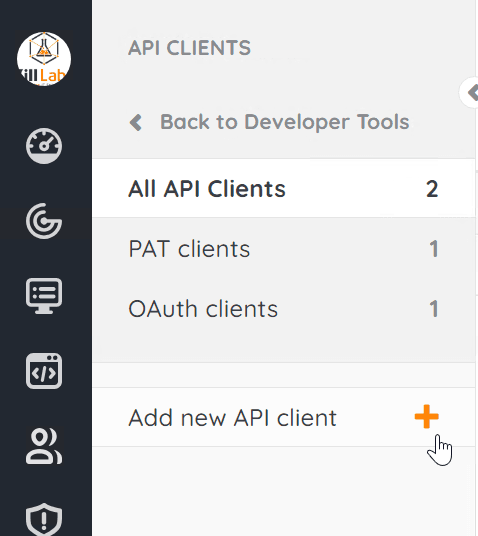
Then, choose ‘Add New API Client’:
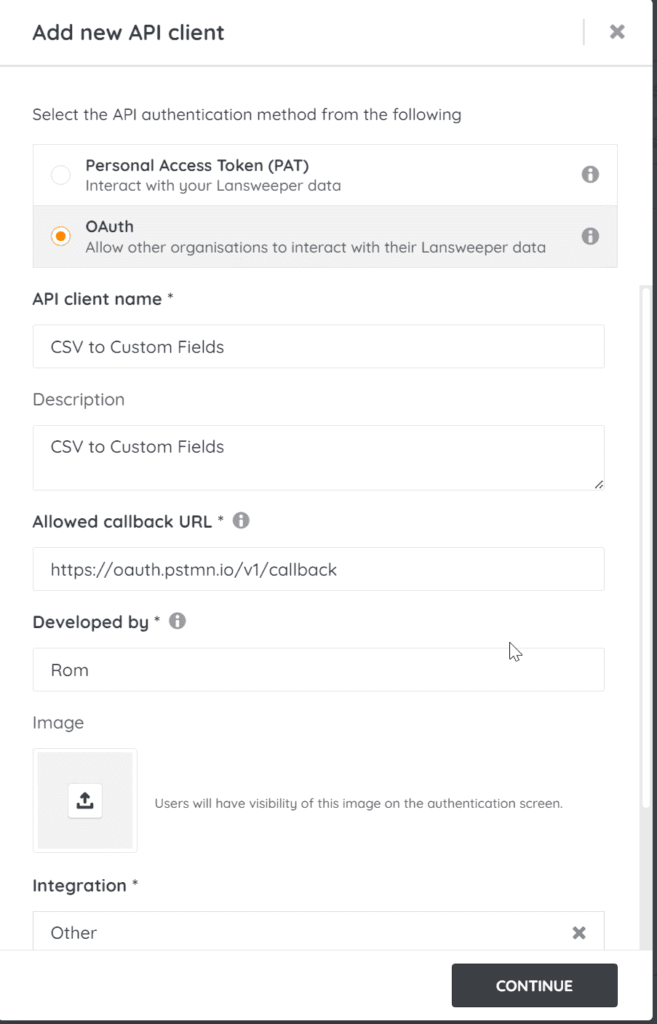
Select ‘OAuth’ for the authentication method, and add a name, description, and the callback URL (I used Postman’s callback API url). Choose ‘Other’ for ‘Integration’ and name accordingly:
One you create the API Client, you will be able to download the client IT and Client Secret:
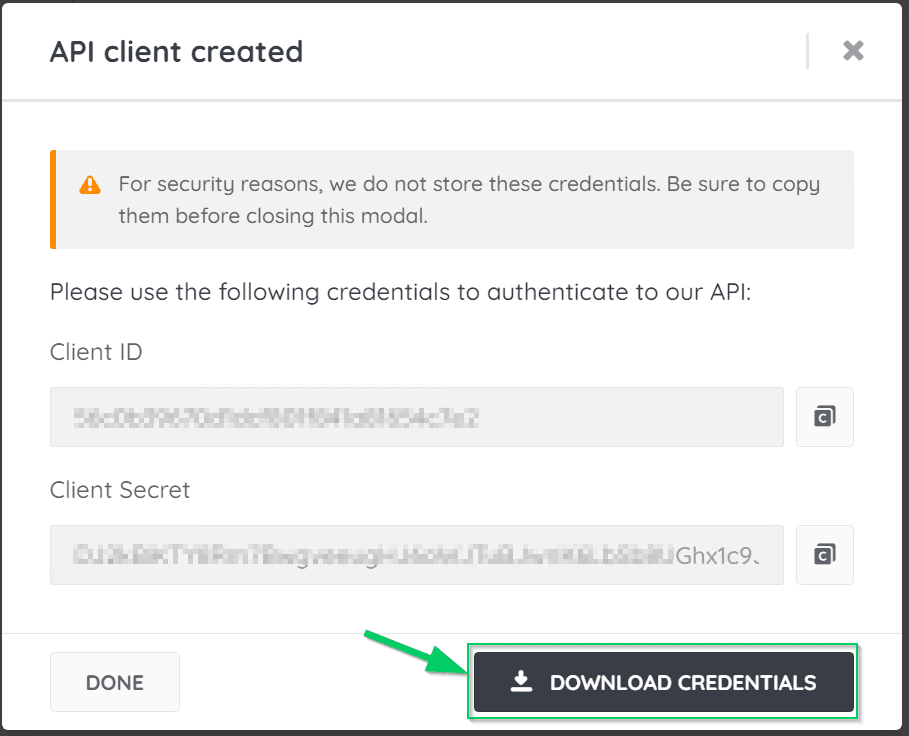
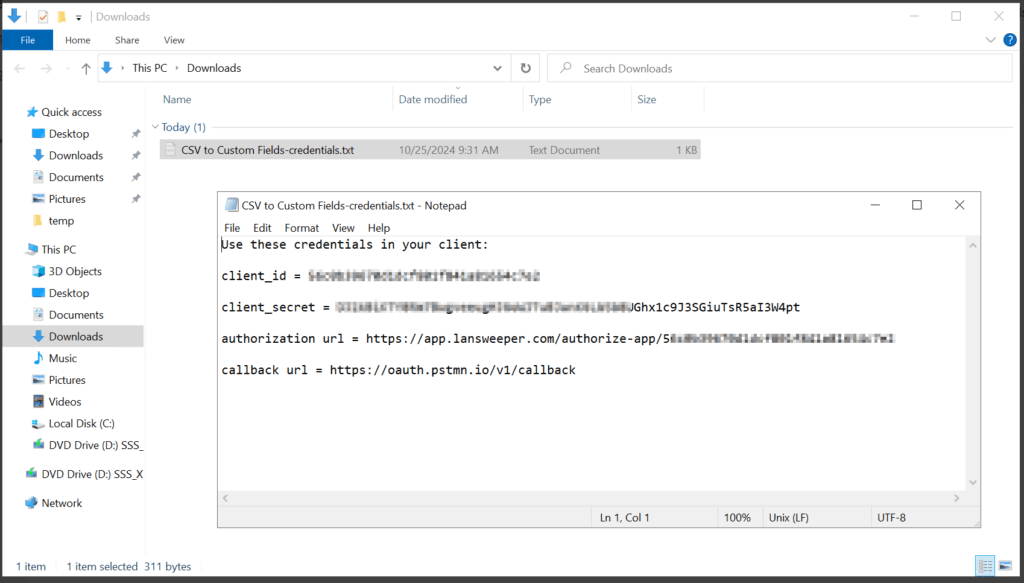
Examining the .txt file, we see the client_id and the client_secret – we will need these later:
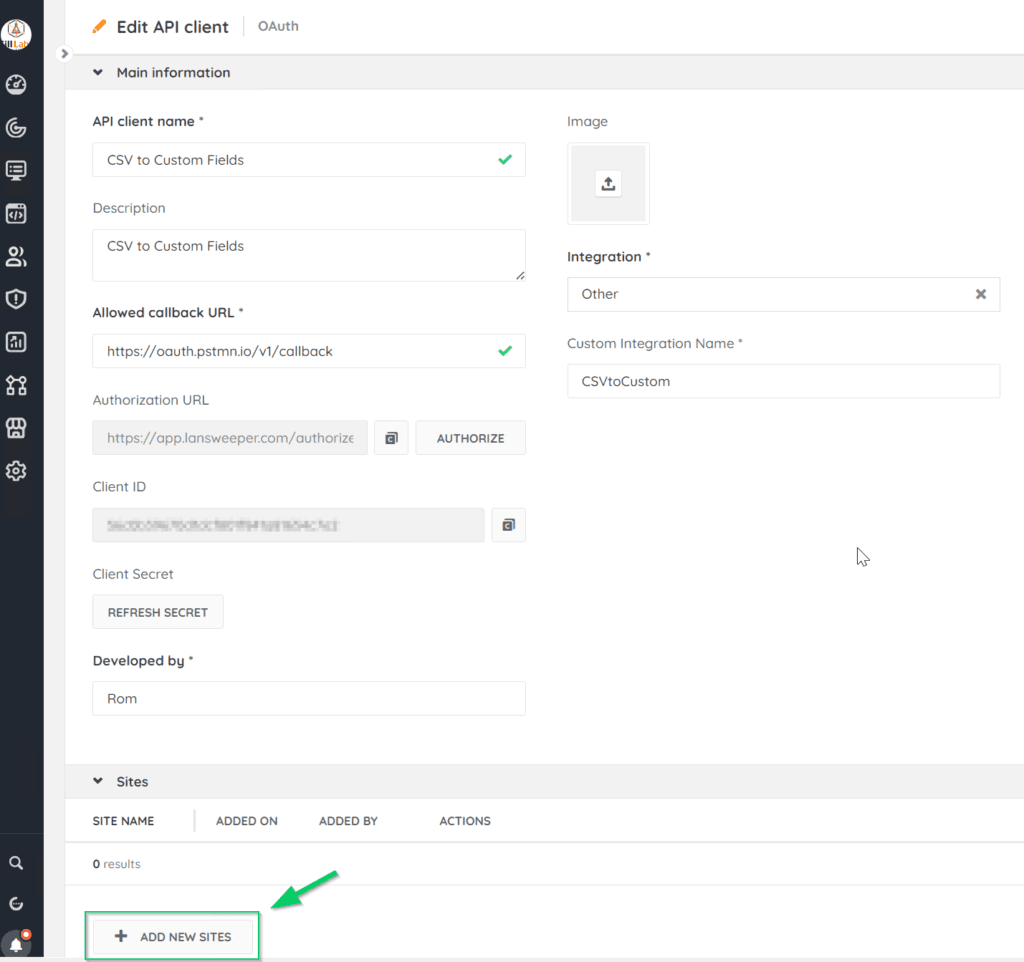
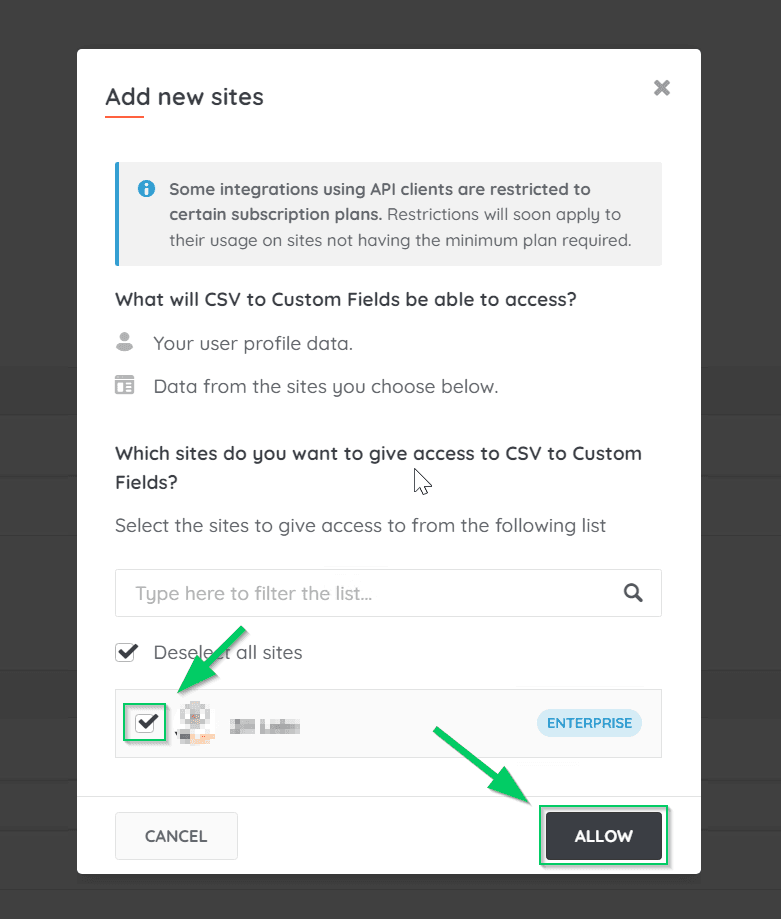
Now, we need to Add/Associate the appropriate Lansweeper Site (Remember, this example only works with a single site – you could get it to iterate through multiple sites with further development):
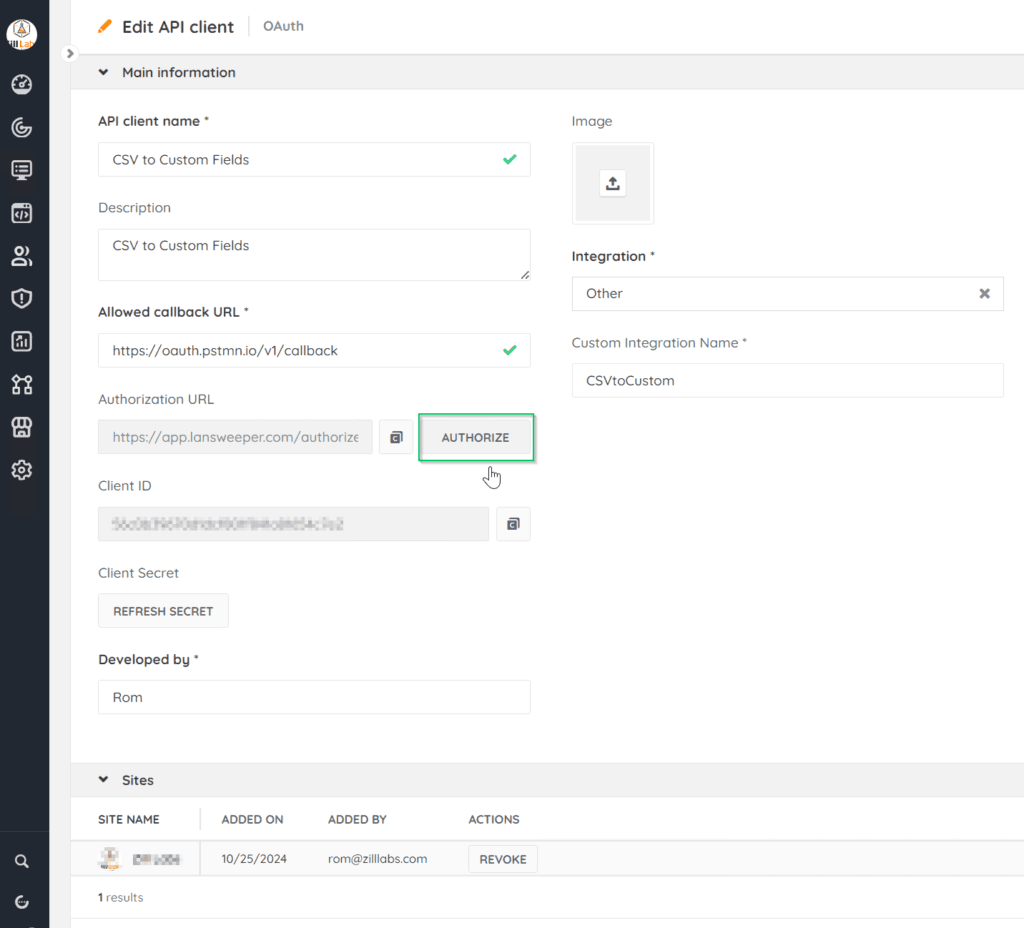
Now, Click ‘Authorize’ to obtain the authorization code – it will generate a token and pass to the Allowed callback URL in a new browser tab:
Copy the authorization code from the return URL:

So far so good. Next, I checked out ‘Making Your First Requests’ – which showed me how to do a few things with Postman – a great API testing application. I’ve used Postman a few times to do some test queries to grab some data, but not much else – but surely it can do much more, and allow someone with little to no API experience (me) to create something really useful.
After reading the examples of basic queries in the documentation, I can now start the process of setting up the custom fields and configuring Postman.
Here’s the overall steps that our Postman collection will take, and an overview of how we will make this happen:
Overview of the Data Flow:
- Get Token → Authenticate and retrieve the tokens needed for further requests.
- Get Authorized Sites → Fetch the site ID needed for asset lookups and updates.
- AssetID Lookup → Find the assets based on CSV fields and retrieves their unique
AssetID. - Get Custom Field Keys → Map custom fields from the CSV to the corresponding keys in Lansweeper.
- Update Custom Fields → Updates the asset’s custom fields based on the CSV data.
Structure of the CSV
For this example – I have a CSV with some identifiers (SerialNumber, MAC, IP, FDQN) and three fields of data for them – each prefaced with ‘csvtestfield’ – which we will use to key off of to dynamically map the data to the fields:
| SerialNumber | MACAddress | IPAddress | FQDN | csvtestfield_custom1 | csvtestfield_custom2 | csvtestfield_custom3 |
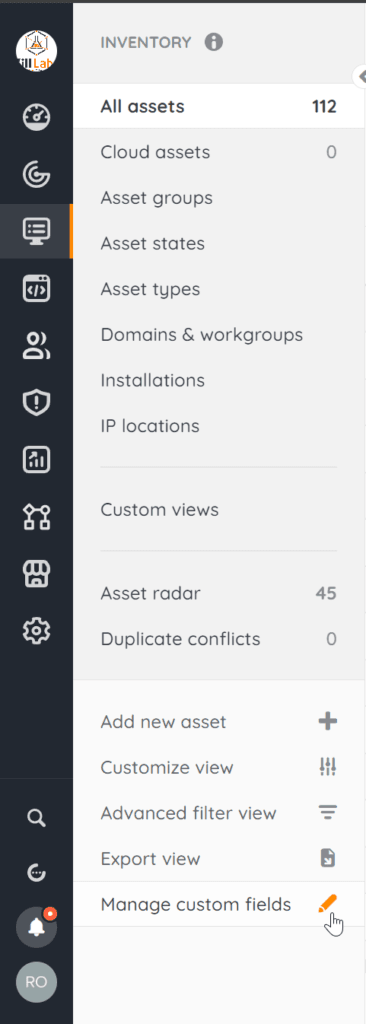
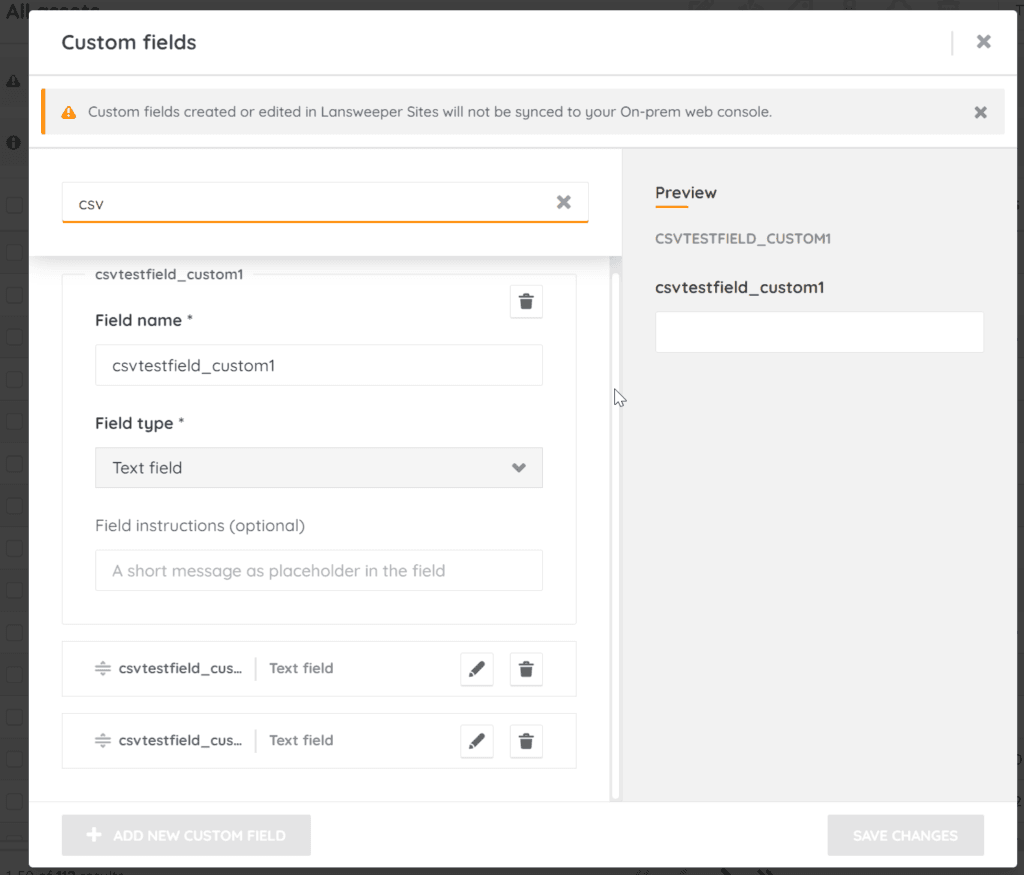
We will need to create the respective custom fields in LS Sites by navigating to Inventory > Manage Custom Fields:
Make sure to match the field name exactly, as it is case sensitive: (csvtestfield_custom1, csvtestfield_custom2, csvtestfield_custom3) – in this example. the three fields will just be general text, so choose ‘Text field’ for the field type.
Using Postman
As it turns out, Postman can do a lot more than just testing APIs and running commands to get or update data. It can run through a chain of actions, execute scripts before and after each step, and collecting data and performing some ETL (extract, transform, load) functions – exactly what we need to take a CSV of asset information of some kind, and updating custom fields for each applicable asset in LS Sites. You can download the postman collections here (Copy the contents of the .docx file into a text file and save it as .json):
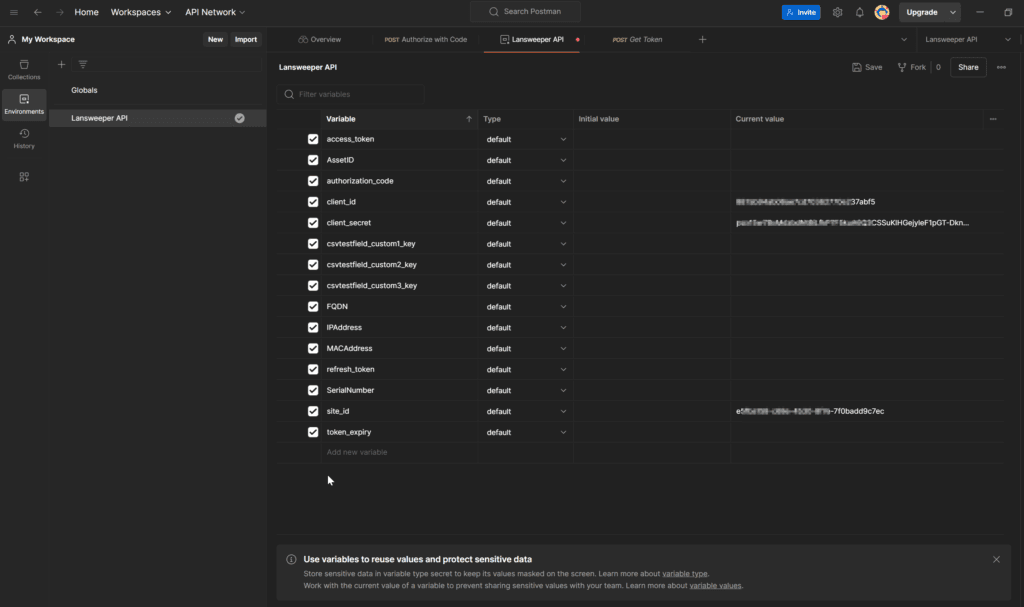
Set Up Variables. I know that starting examples have you entering in information in the headers section, and body/etc – but it’s always best to store things as variables – and Postman has a place for that – the ‘Environments’ section – where we will be storing everything we need (see ‘Environment Variables’ further below in this article). Some of these we will be putting the respective values for, but most of them will be dynamically populated – so it’s OK if most of them are initially blank. You can download the environment here, to then import into Postman:
Each of these environment variables plays a specific role in automating the API requests using Postman and Newman, ensuring that the right data is passed dynamically from the CSV and API responses. You will need to pre-populate the following fields:
client_idclient_secretauthorization_code
(Note: You can either edit the variables in the GUI after you import the collection, or you can edit the .json file prior to importing)

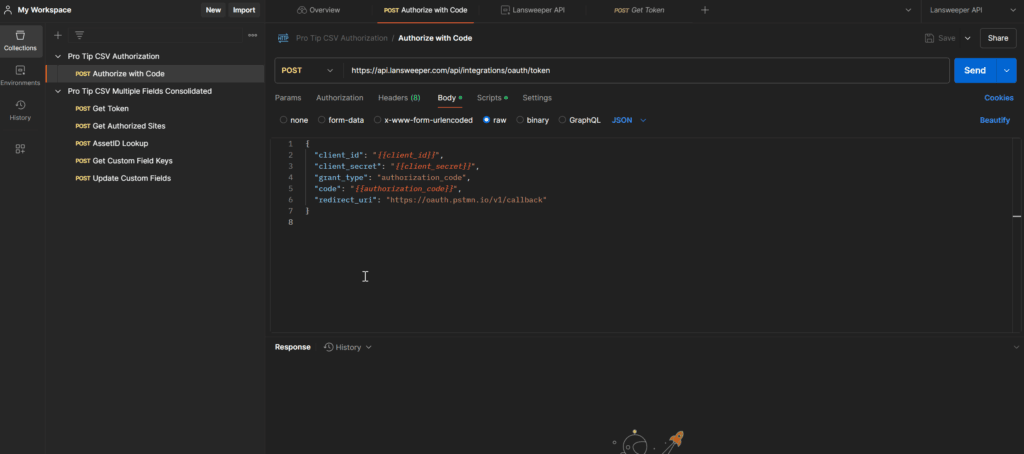
The authorization_code variable should only be needed once, for the one-time run of the ‘Pro Tip CSV Authorization’ collection/step:
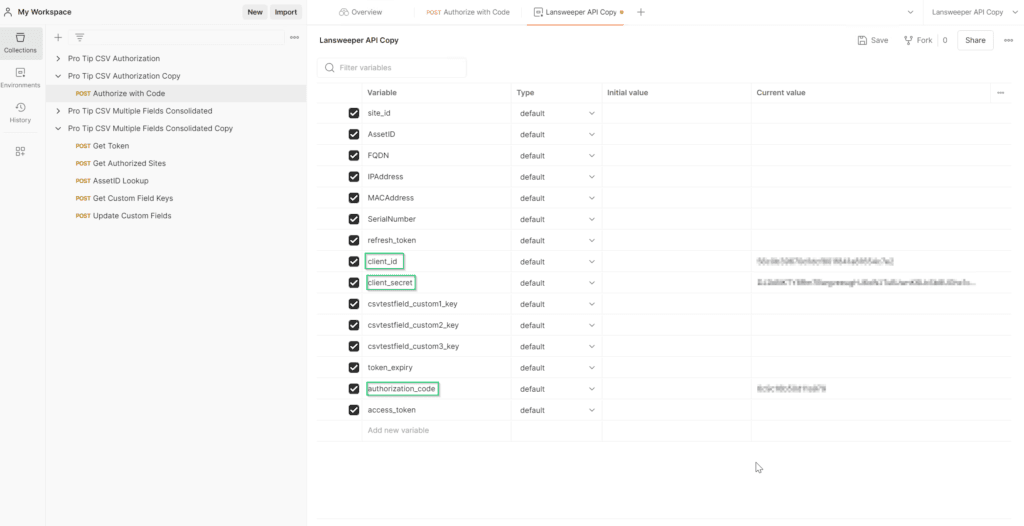
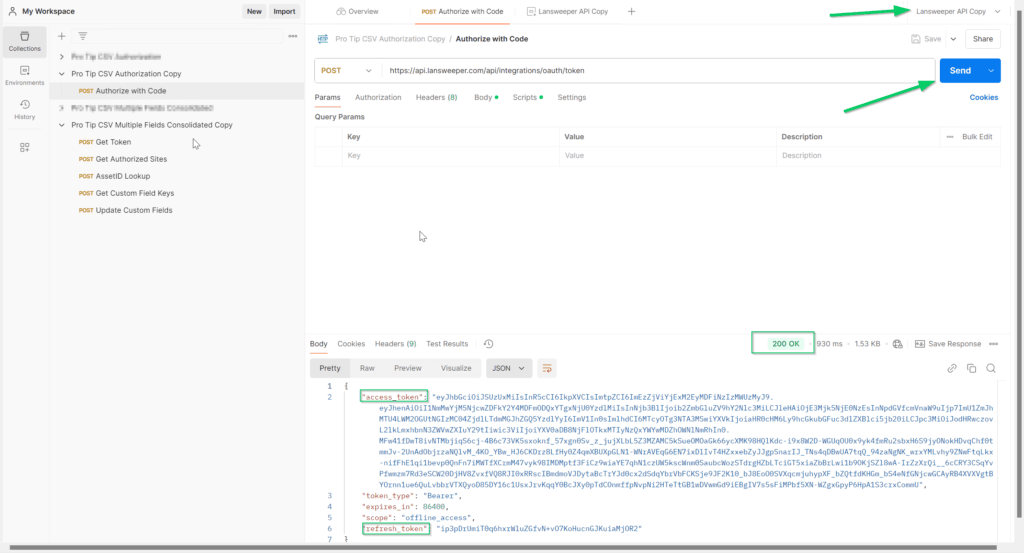
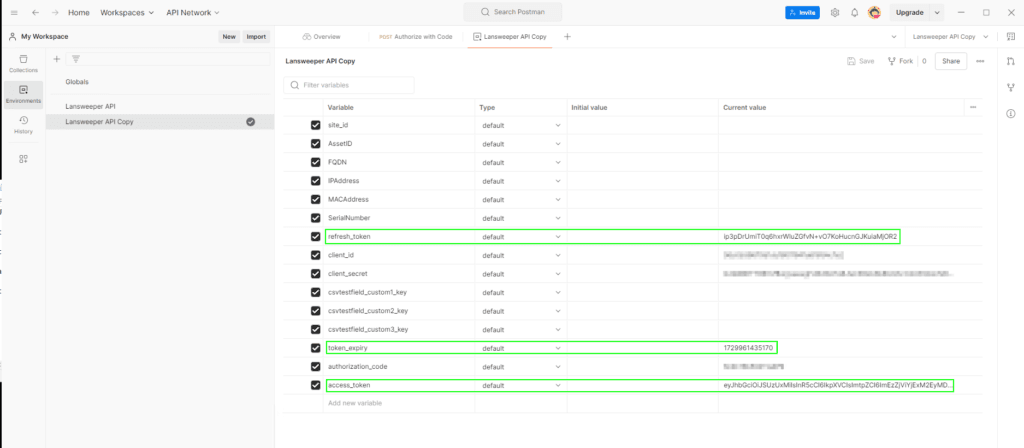
Now, you can utilize Postman’s ‘Collection Runner’ by right-cicking the ‘…’ and choosing ‘Run Collection’:
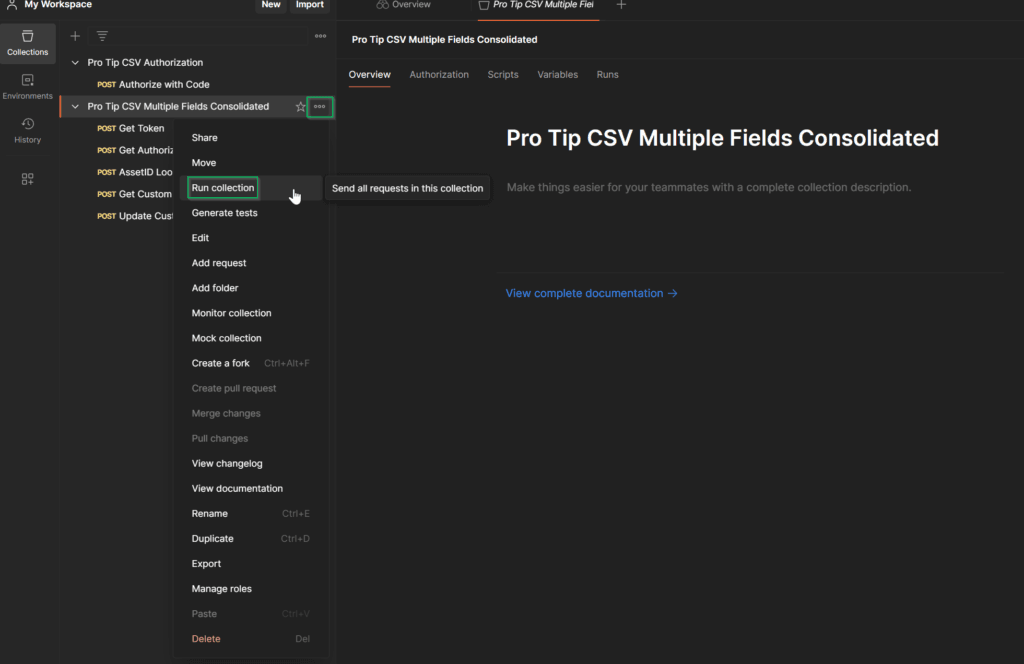
A neat feature in the Collection Runner is the ability to choose a file of data to test with – so we can use the CSV template file that we populated with real data:
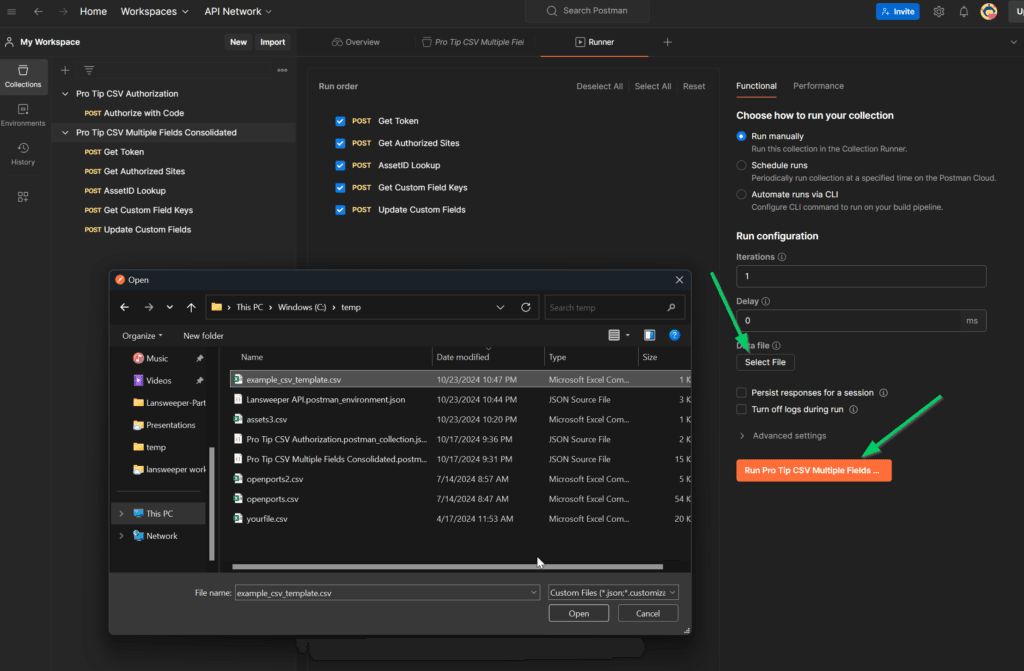
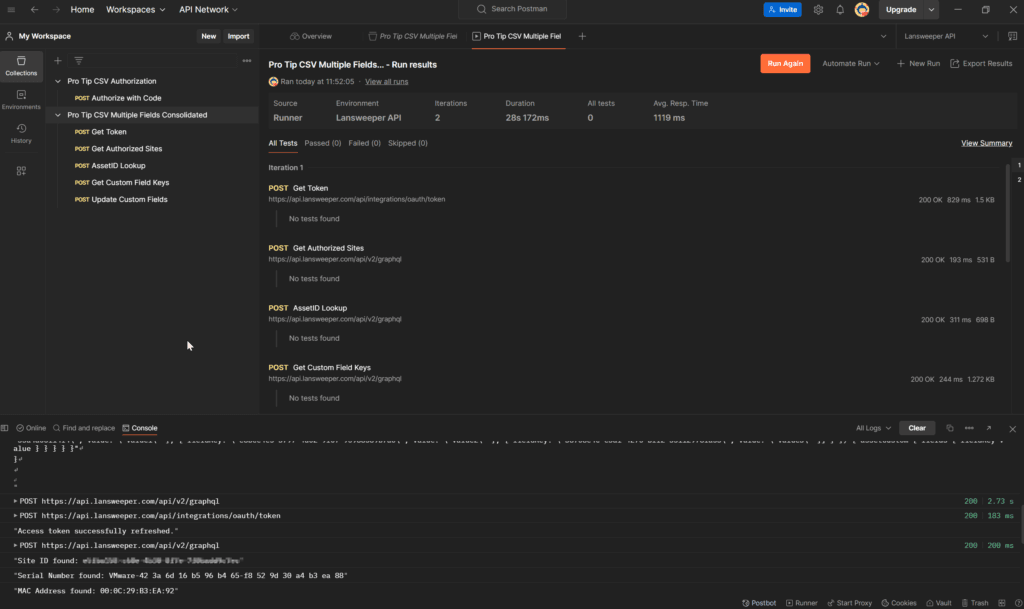
The collection will run, and provide details on the progress:
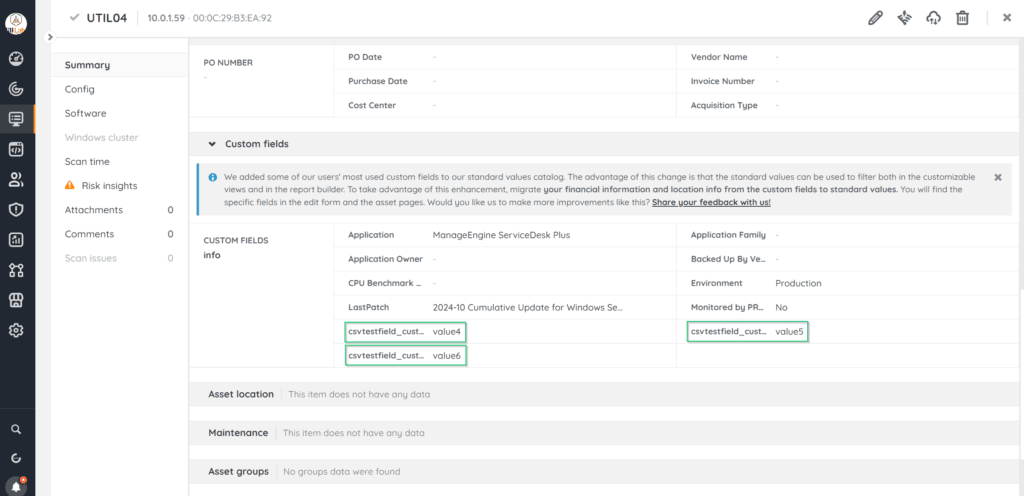
We can then verify that the custom fields populated by pulling up an asset:
Automating with Newman
Automating the Collection Run
Now that I had this working, I needed a way to automate the process. There’s a great program called ‘Newman’ (the mail delivery guy and Jerry’s Nemesis in the show ‘Seinfeld’ – that is a command-line postman collection runner that can be scheduled. Perfect! All we need to do is export the collection, and the environment collection:
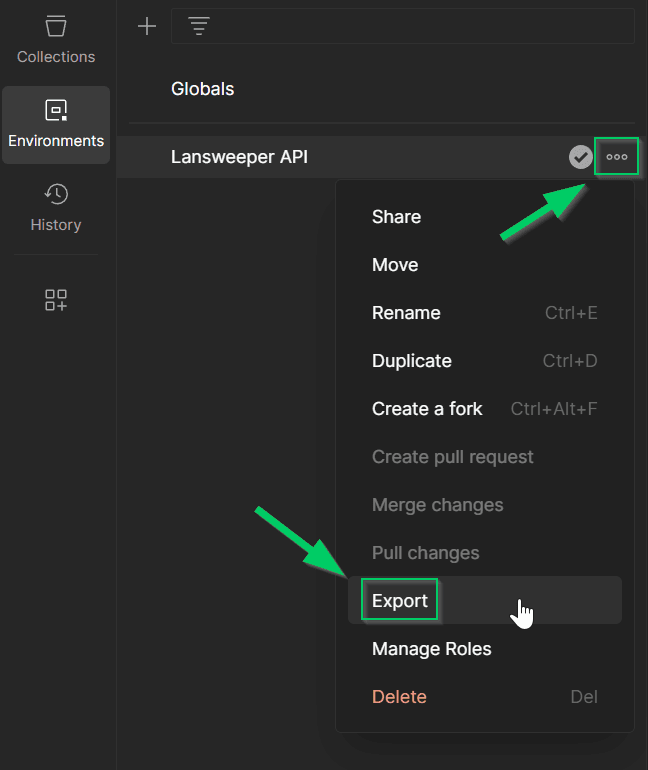
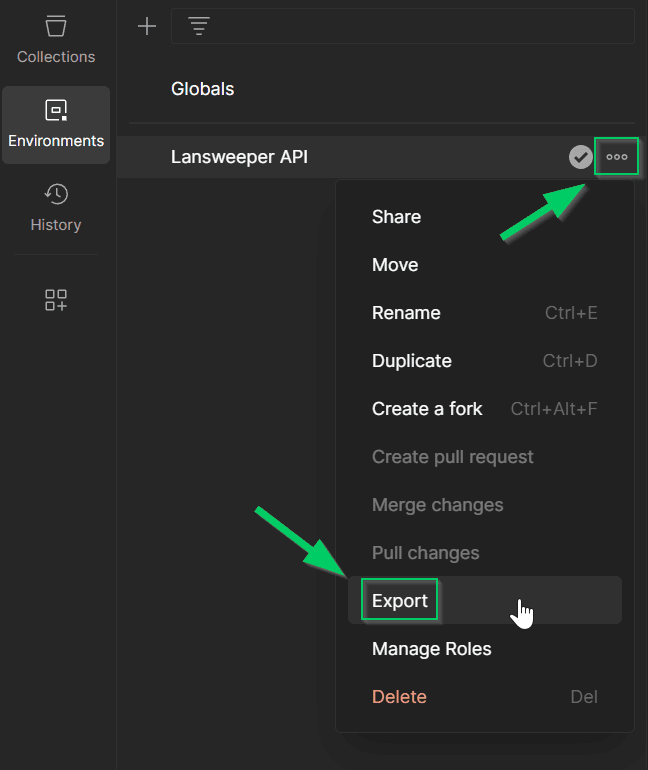
And then enter in your environment variables back in the environment .json file (reference the screenshot above that shows the .json variables in the text editor), as it removes them due to security protection –
NOTE: Protect your environment variables to prevent unauthorized access and potential security issues, as this pro-tip is just an example – you can use a variety of ‘secret’ managers such as AWS Secrets Manager, Azure Key Vault, Google Cloud Secret Manager, CyberArk Conjur, and more. As a fallback, since I don’t use any of those services, I used OpenSSL to encrypt the file – after which I would decrypt the file, tell Newman to run it, and then delete the unencrypted file after execution.
Here’s the neat thing – Newman can process the CSV file with the -d switch!
c:\temp>newman run "Pro Tip CSV Multiple Fields Consolidated.postman_collection.json" -e "Lansweeper API.postman_environment.json" -d "example_csv_template.csv"
Now Newman will run the collection, just like the collection runner in Postman did:
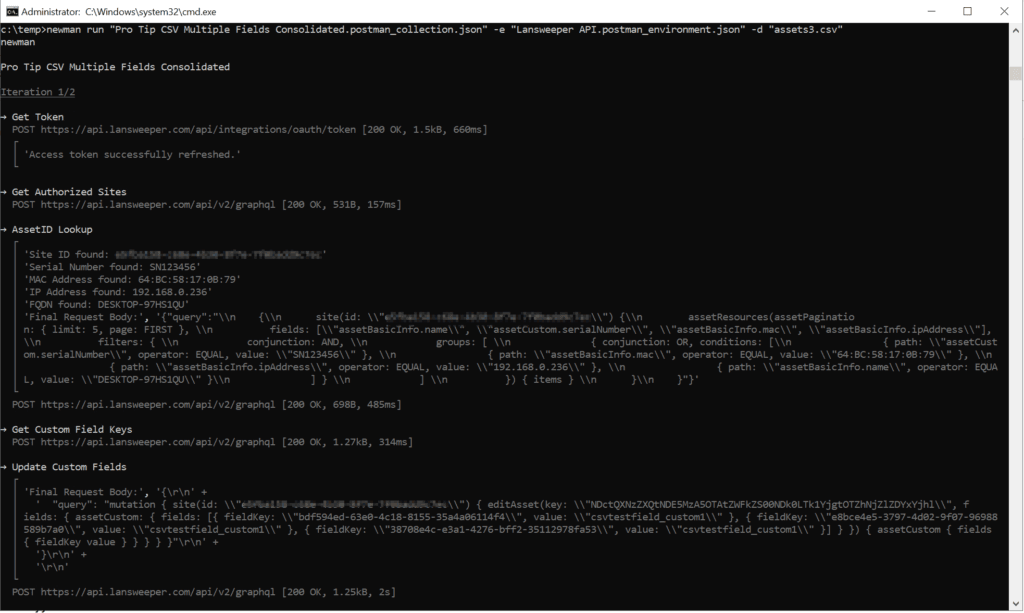
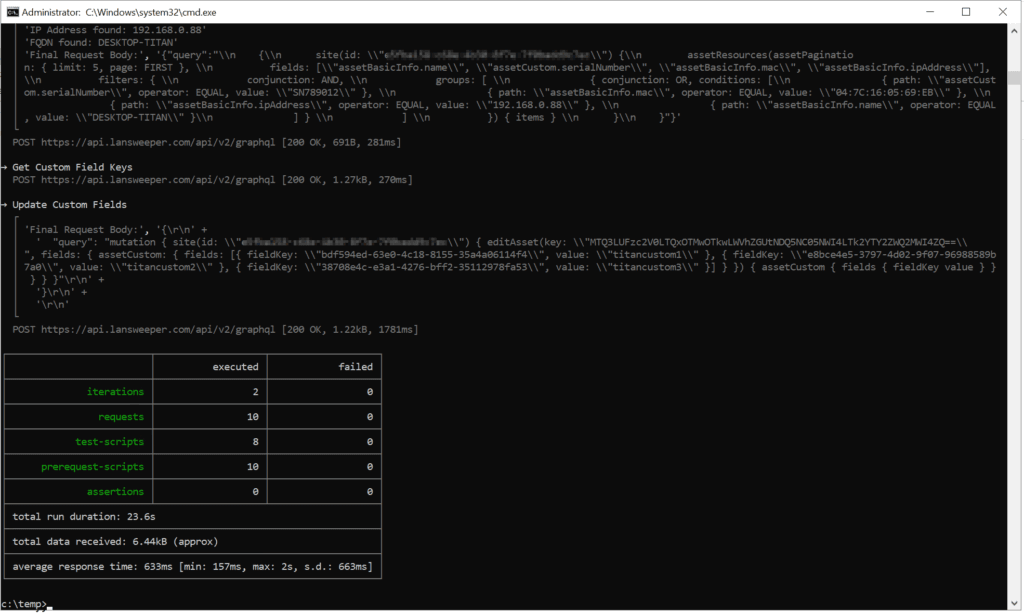
Congratulations, you can now schedule it as a task, and perform updates on custom fields from an on-premise CSV!
To Customize To Your Needs:
- Create the custom fields in LS Sites (I recommend prefacing them uniquely so you don’t go updating other fields by accident)
- Edit the ‘Update Custom Fields’ collection step Pre-Request Script section to process the appropriate headers:
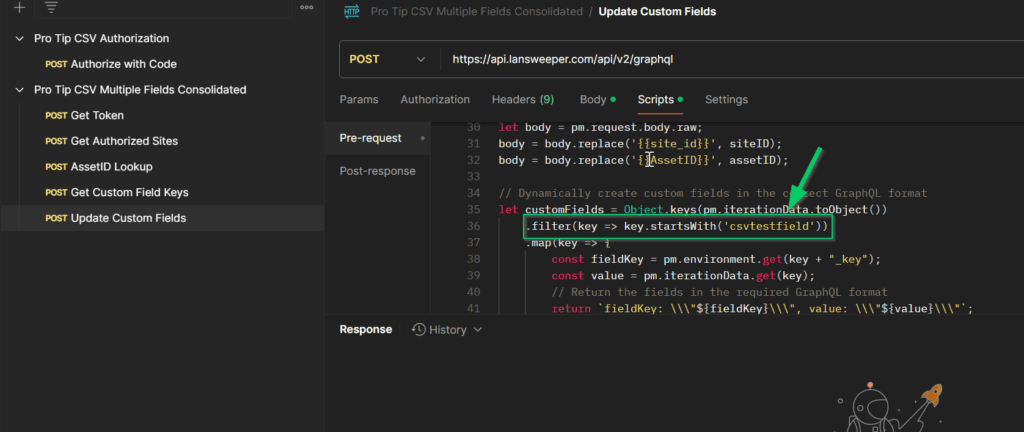
- Make sure your CSV has the same field names as what you put in LS Sites Custom fields
Conclusion
So there you have it – you don’t need to develop an application, or use expensive software in order to connect to Lansweeper’s API and import or update asset information from an on-premise data source – you can simply use Postman, and automate with a Postman Collection Runner such as Newman.
Here’s some of the many possibilities that you can do with this script:
- Having your on-premise monitoring system make a CSV and update LS Sites assets with information such as device group, sensors, etc. – and make a report where the custom fields are missing to find servers/infrastructure that aren’t being monitored
- Scheduling a SCOM CSV export to grab SCOM data specifics
- Running Powershell scripts to CSV that contain any kind of information you wish
- Running PowerCLI scripts to CSV that contain any kind of VMWare information you wish
- Having a backup system make a CSV that contains backup information such as last successful backup, backup job, and any errors encountered – and make a report where servers haven’t been successfully backed up in X days
- Having an on-premise IT Security and Risk Management application automate a CSV export for risk scoring or Disaster/Recovery information
As usual, Happy sweeping everyone!
Jacob
References and Further Information
Pre-Requisites
Install Node.js and npm
Node.js is a runtime environment for JavaScript, and npm is its package manager. Installing them allows you to use Newman for running Postman collections.
- Install Node.js and npm
- Download and install from the official website: Node.js — Download Node.js® (I had to add the directory to the PATH environment variable: C:\Program Files\nodejs)
- Verify installation with:
node -v npm -v
Install Newman
Newman is a command-line collection runner for Postman. It allows you to run Postman collections directly from the command line.
- Install Newman
- Run the following command in your terminal or command prompt:
npm install -g newman
Install Postman
Postman is a widely used tool for API development and testing. You will use it to create and export API collections.
- Install Postman
- Download and install from the Postman website Download Postman | Get Started for Free
Install OpenSSL (Optional for Encryption)
OpenSSL can be used to encrypt sensitive data like environment variables to secure your API tests.
- Install OpenSSL
- On Windows, download the installer from this link: Win32/Win64 OpenSSL Installer for Windows – Shining Light Productions – (I had to add the directory to the PATH/environment variable: C:\Program Files\OpenSSL-Win64\bin)
- On Linux/macOS, it should already be installed.
- Verify by running:
openssl version
Environment Variables
access_token
Description: Stores the access token retrieved from the OAuth process. This token is required for authenticating API requests.AssetID
Description: The unique identifier for the asset that is being updated. It is set based on the API response from asset lookup.authorization_code
Description: This is the one-time use code to initially authenticate with – used in conjunction with your client_id and client_secret.client_id
Description: The client ID provided by Lansweeper API during the OAuth registration. This is used to identify the client when requesting tokens.client_secret
Description: The client secret associated with the client ID, required for securely authenticating and retrieving tokens.csvtestfield_custom1
Description: The value for the first custom field extracted from the CSV data during the Postman run.csvtestfield_custom1_key
Description: The key (or ID) of the first custom field in Lansweeper, mapped dynamically from the CSV during the run.csvtestfield_custom2
Description: The value for the second custom field extracted from the CSV.csvtestfield_custom2_key
Description: The key (or ID) of the second custom field in Lansweeper, mapped dynamically from the CSV.csvtestfield_custom3
Description: The value for the third custom field extracted from the CSV.csvtestfield_custom3_key
Description: The key (or ID) of the third custom field in Lansweeper, mapped dynamically from the CSV.FQDN
Description: A column/header example for our CSV – used to match the CSV data with the asset in Lansweeper Sites. Example: server1.domain.localIPAddress
Description: A column/header example for our CSV – used to match the CSV data with the asset in Lansweeper Sites. Example: 10.0.1.24MACAddress
Description: A column/header example for our CSV – used to match the CSV data with the asset in Lansweeper Sites. Example: 00:0C:29:B3:EA:92redirect_uri
Description: The client ID provided by Lansweeper API during the OAuth registration. This is used to identify the client when requesting tokens.refresh_token
Description: The refresh token is used to request a new access token when the current one expires, allowing long-term access without re-authentication.SerialNumber
Description: A column/header example for our CSV – used to match the CSV data with the asset in Lansweeper Sites. Example: SDB32VEL or 30029356, etc.site_id
Description: Stores the ID of the site (Lansweeper instance) you are working with, retrieved from previous API steps.token_expiry
Description: The timestamp of when the access token will expire. It is used to check whether the token needs to be refreshed.
Postman Collection Overview
Step 1: “Get Token”
- Purpose: Obtain an access token and refresh token from Lansweeper API using the OAuth 2.0 token endpoint.
Pre-request Script:
- What happens:
- The script checks if a
refresh_tokenis present in the environment. - If no
refresh_tokenis found, it logs an error and sets a flag (skip_next_request) to prevent further requests from running. - If the
refresh_tokenis found, theskip_next_requestflag is cleared.
- The script checks if a
Request Details:
- Method: POST
- URL:
https://api.lansweeper.com/api/integrations/oauth/token - Body:
- Contains the OAuth 2.0 parameters:
grant_type:refresh_tokenclient_id: retrieved from the environment ({{client_id}})client_secret: retrieved from the environment ({{client_secret}})refresh_token: retrieved from the environment ({{refresh_token}})
- Contains the OAuth 2.0 parameters:
Post-Request Script:
- What happens:
- After receiving a response, the script checks if the HTTP status code is
200. - If successful:
- It saves the new
access_tokento the environment and calculates its expiry (token_expiry). - If a new
refresh_tokenis provided in the response, it updates that in the environment as well. - Logs a message indicating that the token was successfully refreshed.
- It saves the new
- If unsuccessful:
- Logs the error message and unsets the
access_token.
- Logs the error message and unsets the
- After receiving a response, the script checks if the HTTP status code is
Step 2: “Get Authorized Sites”
- Purpose: Retrieve the list of authorized sites in Lansweeper and store the
site_idfor further requests. NOTE: This script in it’s current form only functions for a single site. Further modification would be needed to iterate through multiple sites.
Pre-request Script:
- What happens:
- The script retrieves the
access_tokenfrom the environment and adds it to the request headers (Authorization: Bearer).
- The script retrieves the
Request Details:
- Method: POST
- URL:
https://api.lansweeper.com/api/v2/graphql - Body:
- A GraphQL query requesting the authorized sites:
{ "query": "{ authorizedSites { sites { id name } } }" }
- A GraphQL query requesting the authorized sites:
Post-Request Script:
- What happens:
- The response is parsed, and the
site_idof the first authorized site is saved to the environment.
- The response is parsed, and the
Step 3: “AssetID Lookup”
- Purpose: Lookup the asset based on CSV input fields (e.g., Serial Number, MAC Address, IP Address, or FQDN) and store its
AssetID.
Pre-request Script:
- What happens:
- The
access_tokenis added to the request headers. - The
site_idis retrieved from the environment, and the script ensures that the required CSV data (serial number, MAC, IP, or FQDN) is available. - Constructs a dynamic GraphQL query based on the available CSV fields:
{ site(id: "siteID") { assetResources(assetPagination: { limit: 5, page: FIRST }, fields: ["assetBasicInfo.name", "assetCustom.serialNumber", "assetBasicInfo.mac", "assetBasicInfo.ipAddress"], filters: { conjunction: AND, groups: [ { conjunction: OR, conditions: [ { path: "assetCustom.serialNumber", operator: EQUAL, value: "serialNumber" }, { path: "assetBasicInfo.mac", operator: EQUAL, value: "macAddress" }, { path: "assetBasicInfo.ipAddress", operator: EQUAL, value: "ipAddress" }, { path: "assetBasicInfo.name", operator: EQUAL, value: "fQDN" } ] } ] }) { items } } }
- The
Request Details:
- Method: POST
- URL:
https://api.lansweeper.com/api/v2/graphql - Body:
- The dynamically constructed GraphQL query (based on CSV fields).
Test Script:
- What happens:
- If the asset is found, its
AssetIDis stored in the environment. - If no asset is found, logs a message indicating this.
- If the asset is found, its
Step 4: “Get Custom Field Keys”
- Purpose: Retrieve the list of custom field keys for the authorized site and dynamically map them to the custom field names in the CSV file.
Pre-request Script:
- What happens:
- The
access_tokenis added to the request headers. - The
site_idis dynamically injected into the GraphQL query in the request body. - The custom fields from the CSV file are injected into the request body.
- The
Request Details:
- Method: POST
- URL:
https://api.lansweeper.com/api/v2/graphql - Body:
- GraphQL query to fetch custom fields:
{ site(id: "{{site_id}}") { customFields { name key } } }
- GraphQL query to fetch custom fields:
Test Script:
- What happens:
- The response is parsed to find matching custom fields from the CSV file.
- For each
csvtestfieldXfrom the CSV, the matching custom field key from the API response is saved in the environment ascsvtestfieldX_key.
